
Last updated: 19 November 2026
Travelling to the European Union with your dog, cat or ferret? There’s a lot to organise, from microchips and rabies vaccinations to health certificates and airline rules. Missing even one detail could stop your pet from travelling.
The good news is that most preparations are simple once you know what to do and when to do it. It’s important to start early, especially if you’re coming from outside the EU.
This guide covers everything from your first vet visit to arriving at your destination. It also includes practical tips for things that are easy to overlook.
In this guide
- Before you start: which travel rules apply?
- 3–4 months before travel: vaccinations and blood tests
- 1–2 months before travel: transport, carriers and GPS trackers
- 14 days before travel: health certificates and documents
- 7 days before travel: medication and final preparations
- 24–120 hours before arrival: tapeworm treatment
- Travel day: documents, supplies and airport security
- After arrival: registration and settling in
- Download your EU pet travel checklist
- One last thing: don’t forget the journey home
1. Before you start: which travel rules apply?
First, establish which rules apply to your journey.
There’s an important difference between travelling from one EU country to another and entering the EU from a non-EU country.
Travelling between EU countries
For most non-commercial journeys with dogs, cats and ferrets, you’ll need a valid EU pet passport, appropriate identification and an up-to-date rabies vaccination.
Depending on your destination, your dog might also need tapeworm treatment.
Travelling from outside the EU
You’ll generally need additional documentation, including an EU animal health certificate and, depending on your country of departure, possibly a rabies antibody blood test.
The requirements vary. For example, travelling from Great Britain is different from travelling from a country where additional rabies testing is required.
Some non-EU countries and territories have special arrangements, so don’t assume the same paperwork applies everywhere.
One more thing: These rules are for non-commercial pet travel. If you’re transporting an animal for sale, adoption or a change of ownership, different requirements may apply, even when no money changes hands.
Non-commercial journeys also generally cover a maximum of five pets, with limited exceptions. Your pet must normally travel with you or an authorised person, with your own journey taking place within five days of the animal’s movement.
Start by checking the official EU pet travel requirements.
You can also explore our ChipTrace country guides for information about microchip identification and registration in individual countries.
2. 3–4 months before travel: vaccinations and blood tests
This is the stage to get the important veterinary requirements sorted.
Some pets need only a little preparation to travel. Others may need several months, especially if rabies antibody testing is needed.
If your pet needs its first rabies vaccination and a blood test, start at least four to five months before travelling. The waiting periods alone can take more than four months.
Check your pet’s microchip
Your dog, cat or ferret must have an accepted form of permanent identification.
For most pets, that means a microchip meeting the relevant international standards. A clearly readable tattoo applied before 3 July 2011 may also be accepted under the relevant EU rules.
Ask your veterinarian to scan the microchip and verify that the number matches your pet’s documents.
The microchip must have been implanted or read before the rabies vaccination used for travel.
If your pet’s records contain a microchip number with a typo, now is the time to correct it.
Also, check that your pet’s microchip registration has your current contact details. A microchip is only helpful for reuniting you with your pet if the registry has up-to-date information.
You can use the free ChipTrace microchip lookup to investigate where a microchip may be registered.
For more information, read our Pet Microchip Numbers Explained guide.
Check the rabies vaccination
Dogs, cats and ferrets generally need a valid rabies vaccination to enter or travel within the EU.
Your pet must normally be at least 12 weeks old for its first rabies vaccination.
After the primary vaccination, you must wait at least 21 days before travelling. If the vaccine’s instructions specify a longer period before immunity develops, that longer period applies.
If your pet already has a valid vaccination, check its expiry date.
Be particularly careful with boosters. If one is given after the previous vaccination has expired, it may count as a new primary vaccination, meaning another waiting period.
There are limited exceptions for young pets on certain routes, but many EU countries don’t allow unvaccinated puppies and kittens to enter.
Does your pet need a rabies antibody test?
Some pets entering the EU from outside the EU need a rabies antibody titration test.
This blood test checks whether the rabies vaccination has produced an adequate immune response.
When the test is required, the usual process is:
- Your pet receives a valid rabies vaccination.
- For a primary vaccination, you wait at least 30 days before the blood sample is taken.
- An authorised veterinarian takes the sample and sends it to a designated laboratory.
- The result must meet the required antibody level of at least 0.5 IU/ml.
- You normally wait three months from the date of blood sampling before entering the EU.
So, if you’re starting from the beginning, the whole process can take over four months.
Not every country of departure requires this test, and certain returning EU pets have exceptions.
Don’t leave this until the last minute. If you’re unsure whether your pet needs a blood test, check with your vet and the relevant EU entry authority before booking your journey.
3. 1–2 months before travel: transport, carriers and GPS trackers
Next, let’s look at the practical arrangements.
Whether you’re travelling by car, ferry or plane, your pet needs a safe and comfortable way to make the journey.
Travelling by plane? Check the airline rules first
Airlines have their own requirements for transporting animals.
Some allow small pets in the cabin, while larger animals must travel in the hold or as cargo. Others don’t accept certain pets, breeds or transport arrangements.
Before booking, check:
- Whether your airline accepts dogs, cats or ferrets on your chosen route.
- Whether your pet can travel in the cabin or must travel in the hold or as cargo.
- Maximum carrier dimensions and combined pet-and-carrier weight.
- Whether the airline accepts pets on connecting flights.
- Any temperature, seasonal, age or breed restrictions.
- Pet transport fees and reservation requirements.
Remember, booking your own ticket doesn’t automatically reserve a place for your pet.
Airlines usually limit how many animals can travel on each flight. Make sure to confirm your pet’s reservation separately.
Choose the right travel carrier
The best carrier isn’t always the most expensive. It should fit your pet well, close securely and meet the transport company’s rules.
Your pet should have enough space to stand, turn around and lie down naturally.
For air travel, check the relevant IATA guidance on travelling with pets and your airline’s specific requirements.
Be cautious about carriers advertised as “IATA approved”. IATA publishes transport standards but does not personally certify commercial pet carriers.
Practise using the carrier
This small step can make a big difference.
Don’t introduce your cat to a carrier for the first time on the morning of an international flight.
Leave the carrier open at home, add familiar bedding and encourage your pet to explore it. Gradually practise closing the door and spending short periods inside.
And here’s something many people forget:
Practise opening, closing and locking the carrier yourself.
You should be able to operate every latch confidently, even when you’re tired, distracted or dealing with a frightened animal.
Check that the door cannot be pushed open accidentally and that all fastenings are secure.
For dogs travelling by car, use an appropriate secured crate or suitable vehicle restraint, following the rules of the countries you’ll be driving through.
Consider a GPS tracker for extra peace of mind
A GPS tracker can be very helpful when travelling with a dog or cat, especially if your pet is nervous, easily frightened or likely to run away.
If an animal escapes at an airport, motorway stop or unfamiliar accommodation, finding it can be extremely difficult.
Unlike at home, your pet may have no familiar surroundings to help it find its way back.
A GPS tracker can help you find your pet much faster, provided it is working and has sufficient satellite and mobile-network coverage.
Before travelling:
- Make sure the tracker fits securely and comfortably.
- Check that the tracking service works in your destination country.
- Fully charge the battery and pack the charger.
- Check whether your airline permits the tracker during transport, particularly for pets travelling in the hold or as cargo.
- Remember that tracking may be limited inside buildings, underground areas and other enclosed spaces.
Airlines may restrict battery-powered devices and transmitters, so always check before you fly. Don’t assume a GPS tracker is allowed just because it’s small.
A GPS tracker doesn’t replace a microchip.
A microchip helps identify your pet when someone finds it. A GPS tracker helps you find your pet.
Give your pet time to get used to the GPS tracker
If your pet has never worn a GPS tracker before, introduce it well before your trip.
Some animals, especially cats, may need a few days to get used to the extra weight or new feeling of something on their collar.
At first, they might scratch at it, walk strangely or try to remove it.
Begin with short, supervised sessions at home and slowly increase how long your pet wears it.
Check that the collar fits well and that the tracker does not get in the way of your pet’s normal movement, eating, or resting.
For cats, pick a lightweight tracker that fits their size and use a properly fitted, cat-safe breakaway collar. Keep in mind that breakaway collars can come off, so GPS is an extra precaution, not a guarantee.
Don’t wait until the day you travel to put on a GPS tracker for the first time.
Give your pet enough time to get comfortable wearing it.
4. 14 days before travel: health certificates and documents
Now is the time to make sure all your paperwork is ready.
Do you need an EU animal health certificate?
If you’re travelling from outside the EU, you will generally need an EU animal health certificate unless your journey qualifies for an accepted alternative document.
The certificate records important information about your pet, including its identification and vaccination details.
For most non-EU entries, the certificate must be issued within 10 days before your pet enters the EU.
Why start checking two weeks ahead?
Because booking an appointment, finding an authorised vet, and getting any needed official approval can take time.
Book your appointment early, but make sure the certificate is issued within the right time frame.
If you’re travelling by sea, the 10-day entry period may be extended by the duration of the sea journey.
After the required checks on entry, the certificate can generally be used for onward non-commercial travel within the EU for up to six months, or until the rabies vaccination expires, whichever comes first.
Double-check every detail
Before you leave the vet’s office, carefully compare all your documents.
Check your pet’s name, description, microchip number, vaccination details, certificate dates and required signatures or endorsements.
Make sure any rabies blood test results are included where required.
You’ll generally also need a signed declaration confirming that the journey is non-commercial when entering from outside the EU.
You don’t want to find out about a missing signature or wrong microchip number at the airport check-in desk.
Keep your original documents together and make backup copies.
Digital copies can be helpful, but they usually don’t replace the original documents that authorities need.
Double-check your travel route
If you’re entering the EU from outside it, check whether you must use a designated travellers’ point of entry.
Also check any countries where you’ll change planes, drive through or stop overnight.
If your trip goes through several countries, there may be extra requirements, even if your final destination seems simple.
5. 7 days before travel: medication and final preparations
By now, most of the complicated paperwork should be sorted out.
Now, focus on your pet’s comfort and what you’ll need for the trip.
Check your pet’s medication
If your pet takes regular medication, make sure you have enough for the entire trip, plus a reasonable supply in case of delays.
Order repeat prescriptions now, rather than discovering too late that the pharmacy needs a few days to obtain something.
Keep medication in its original packaging where possible, and carry the prescription or a veterinary note when appropriate.
Check if your destination has any rules about bringing in certain veterinary medicines.
If you’re flying, check how medication should be packed and if anything needs to be kept cold.
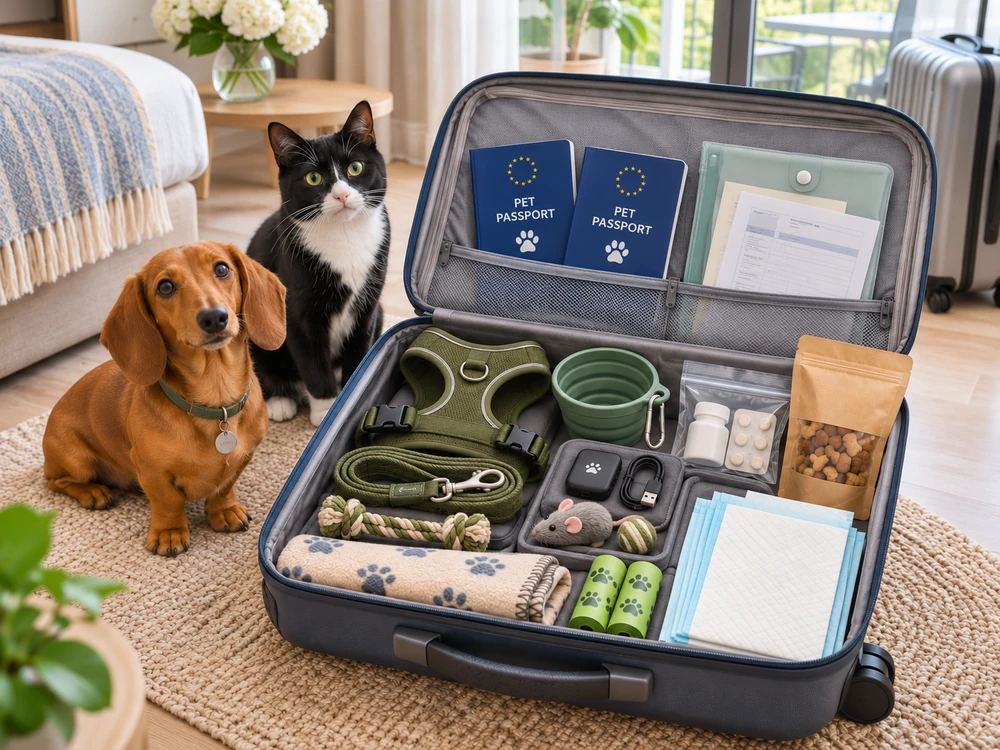
Prepare your pet’s travel bag
A useful travel bag might contain:
- Food and suitable travel treats.
- A water bottle and portable bowl.
- Any regular medication.
- Spare absorbent pads and bedding.
- Waste bags, tissues and cleaning supplies.
- A lead, harness or other suitable restraint.
- A familiar blanket or small comfort item.
- Copies of veterinary documents.
- Your veterinarian’s contact details.
- Contact information for an emergency veterinary clinic at your destination.
- Your GPS tracker charger, if applicable.
For cats, a familiar-smelling blanket can make the carrier feel less intimidating.
For longer journeys, think about toileting arrangements and how your pet will get water safely.
Check the carrier one more time
Check that the carrier is clean, put together correctly, and comfortable.
Look over every latch and fastening.
If the carrier has detachable wheels, removable accessories or loose straps, check whether these are permitted by the airline.
Attach your contact details where appropriate, including a telephone number with the international dialling code.
Give the carrier door one last check.
It’s much better to find a faulty latch at home than at the airport.
6. 24–120 hours before arrival: tapeworm treatment
It’s easy to miss this step since it doesn’t apply to every pet or every destination.
Dogs travelling to Finland, Ireland or Malta generally require treatment against the tapeworm Echinococcus multilocularis.
The same requirement also applies to dogs entering Norway and Northern Ireland, which are not EU member states but follow relevant pet travel arrangements.
The treatment must be administered by a veterinarian between 24 and 120 hours before the scheduled time of entry.
This means the treatment must be given one to five days before you arrive.
The veterinarian must record the treatment, including the date and time, in the appropriate section of the pet passport or animal health certificate.
Cats and ferrets do not need this particular treatment.
There are some exceptions for direct trips between these places, so check the rules for your specific journey.
Remember, the timing is based on when you arrive, not just the day you leave.
If your trip is long and has several stops, make sure to work out the treatment timing carefully.
7. Travel day: documents, supplies and airport security
It’s finally time to set off!
By now, you should have all the important preparations done.
Allow yourself extra time, especially if you’re flying.
Before leaving home
Check that you have:
- Your pet’s passport or animal health certificate.
- Rabies vaccination documentation and any required blood test results.
- Tapeworm treatment records, if applicable.
- Airline or ferry booking confirmation for your pet.
- Your own travel documents.
- Medication, food and water.
- A properly secured carrier.
- Your pet’s emergency contact information.
Don’t introduce new foods or make sudden changes to your pet’s usual routine.
If your pet gets anxious about travel, talk to your vet for advice well before you leave.
Sedatives and tranquillisers are usually not recommended for air travel because they can cause extra health risks. Only use them if your vet says it’s safe.
Airport security: an important warning for owners of anxious pets
This is something that often surprises people.
At many airports, pets travelling in the cabin must be removed from their carriers during security screening. Pets travelling in the hold or as cargo may also undergo checks that involve opening the carrier or temporarily removing the animal.
The exact procedure depends on the airport, airline and type of transport.
For cabin pets, the empty carrier may need to pass through baggage screening equipment while the animal is checked separately.
For pets travelling in the hold or as cargo, security checks are often handled by specialist airport staff or ground handlers.
This can be particularly frightening for a nervous cat or a dog that isn’t comfortable being handled by strangers.
A busy airport is the last place you want a frightened cat escaping from its carrier.
Don’t assume that a separate screening area is a secure, enclosed room.
At some Spanish airports, pets may be taken to an area away from the main security queue that still has open exits or accessible escape routes.
For a frightened animal, that may not be safe.
If your pet can’t be safely taken out of its carrier in an open area, calmly and firmly explain this before anyone opens it.
Ask for a fully enclosed office, a private screening room or another secure arrangement.
In Spain, you can also ask whether the Guardia Civil can assist if you cannot agree on a safe procedure with the available staff.
For animals travelling in the hold or as cargo, discuss the handling and screening arrangements with the airline or cargo company before handing over your pet.
Keep in mind:
- A separate screening area is not always an enclosed room.
- Make sure all doors are closed and there are no open escape routes.
- Let staff know if your pet might panic or try to escape.
- Ask for a secure setup before opening the carrier.
- Allow extra time in case additional staff or alternative arrangements are needed.
- Never assume that holding a frightened cat tightly will prevent an escape.
Security checks are mandatory, and asking for a private room does not mean the airport must provide one or waive the inspection. The aim is to work with staff to find a safe way to complete the checks.
For cats, a well-fitted harness can be an extra precaution during handling, as long as your cat is used to wearing one. It’s not a replacement for a secure carrier or an enclosed screening area.
A frightened cat can escape in seconds. Making sure the area is genuinely secure before opening the carrier is worth the extra effort.
During the journey
Keep your pet comfortable and follow the instructions from the transport company.
Give your pet water when it’s safe and allowed, and check how they’re doing whenever you can.
If your pet is flying in the cabin, keep them in their carrier for the whole flight, following the airline’s rules.
When driving, stop regularly so your pet can have a break. Never leave them alone in a hot car.
Remember that even normally calm pets can become stressed when travelling.
Being patient really helps.
8. After arrival: registration and settling in
You’ve made it!
Before you celebrate, there are a few last things to do.
Complete any required entry checks
When entering the EU from outside it, follow the instructions for presenting your pet to the appropriate authorities.
They may check the documents and scan the microchip to confirm that the number matches.
Don’t assume that simply walking through the airport means all the required veterinary checks have been completed.
Check local microchip registration requirements
Even if your pet’s microchip is valid, it might not be registered in your new country.
If you’re moving permanently, you may need to register the microchip in a local or national database.
Each country has its own rules and deadlines.
Our ChipTrace country guides explain identification and registration arrangements in individual countries.
Make sure to update your contact details, like your new phone number and address, wherever needed.
Your pet’s microchip might still be registered in the old country, so check that the records have your current contact details.
Arrange a local veterinary appointment
If you’re moving instead of just visiting, it’s smart to find a local vet.
A local vet can help with registration, ongoing care and travel documents for future trips.
They can also tell you if you’ll need an EU pet passport for future travel.
Give your pet time to settle in
After a long trip, your pet might be tired, quiet, or a bit unsettled—this is normal.
Give your pet a quiet spot, their usual food, and time to settle in.
For cats, it’s often easier to let them start in one safe room instead of the whole house at once.
If you’re staying in a hotel or holiday rental, inspect the room carefully before opening your cat’s carrier.
A nervous cat can find hiding spots you’d never expect, and some can be very hard to reach.
Look under beds, behind furniture, around bathroom fittings and anywhere there could be an opening into a wall or enclosed space.
Some cats have hidden behind bidets or squeezed through bathroom wall gaps, making it hard for owners to find them for hours.
When a cat is frightened, almost anywhere can seem like a good hiding place.
Before letting your cat out of its carrier:
- Check for gaps and openings. Look behind bathroom fixtures, under fitted furniture and around exposed pipes.
- Inspect unusual hiding spots. A small opening may lead into a much larger space that you cannot reach.
- Shut windows and balcony doors so your cat can’t get out into a place they don’t know.
- Make sure any risky spaces are secure. If there are unsafe gaps, ask hotel staff for help instead of trying to fix them yourself.
- Pick a safe room. If the bathroom has gaps you can’t reach, it’s probably not the best spot for your cat.
Once the room is safe, give your pet a comfy hiding spot, like their open carrier with their usual bedding.
The goal isn’t to stop an anxious cat from hiding. It’s to make sure you can find and safely reach it when necessary.
Keep doors and windows closed until your pet feels at home.
You can save sightseeing for later—your cat will probably just want a nap right now.
9. Download your EU pet travel checklist
The full checklist is much easier to use when you can tick things off as you prepare. Rather than scrolling through a long list, download our free two-page PDF and keep it with your travel documents.
Download the free EU Pet Travel Checklist (fillable PDF)
It covers vaccinations and microchips, transport and GPS trackers, paperwork, medication, airport security and what to do after arrival.
Not every requirement applies to every journey. Always confirm the current rules for your departure country, destination and type of travel.
One last thing: don’t forget the journey home
If you’re visiting the EU rather than moving permanently, remember to check the requirements for returning to your country of residence.
Your return journey may have different documentation, vaccination, parasite treatment or entry requirements.
For example, dogs returning to Great Britain from most countries need tapeworm treatment within the required timeframe, even if they didn’t need it when entering the EU.
Don’t assume that because your pet was allowed into the EU, the journey home will automatically be just as straightforward.
If you’re planning future trips, keep your pet’s documents organised and vaccinations up to date. A little preparation now can save a great deal of paperwork later.
Travelling with an animal takes more planning than travelling alone. But with the right documents, a secure carrier and a sensible checklist, there’s no reason your four-legged companion can’t enjoy the adventure too.